Nodes
What is a Node?
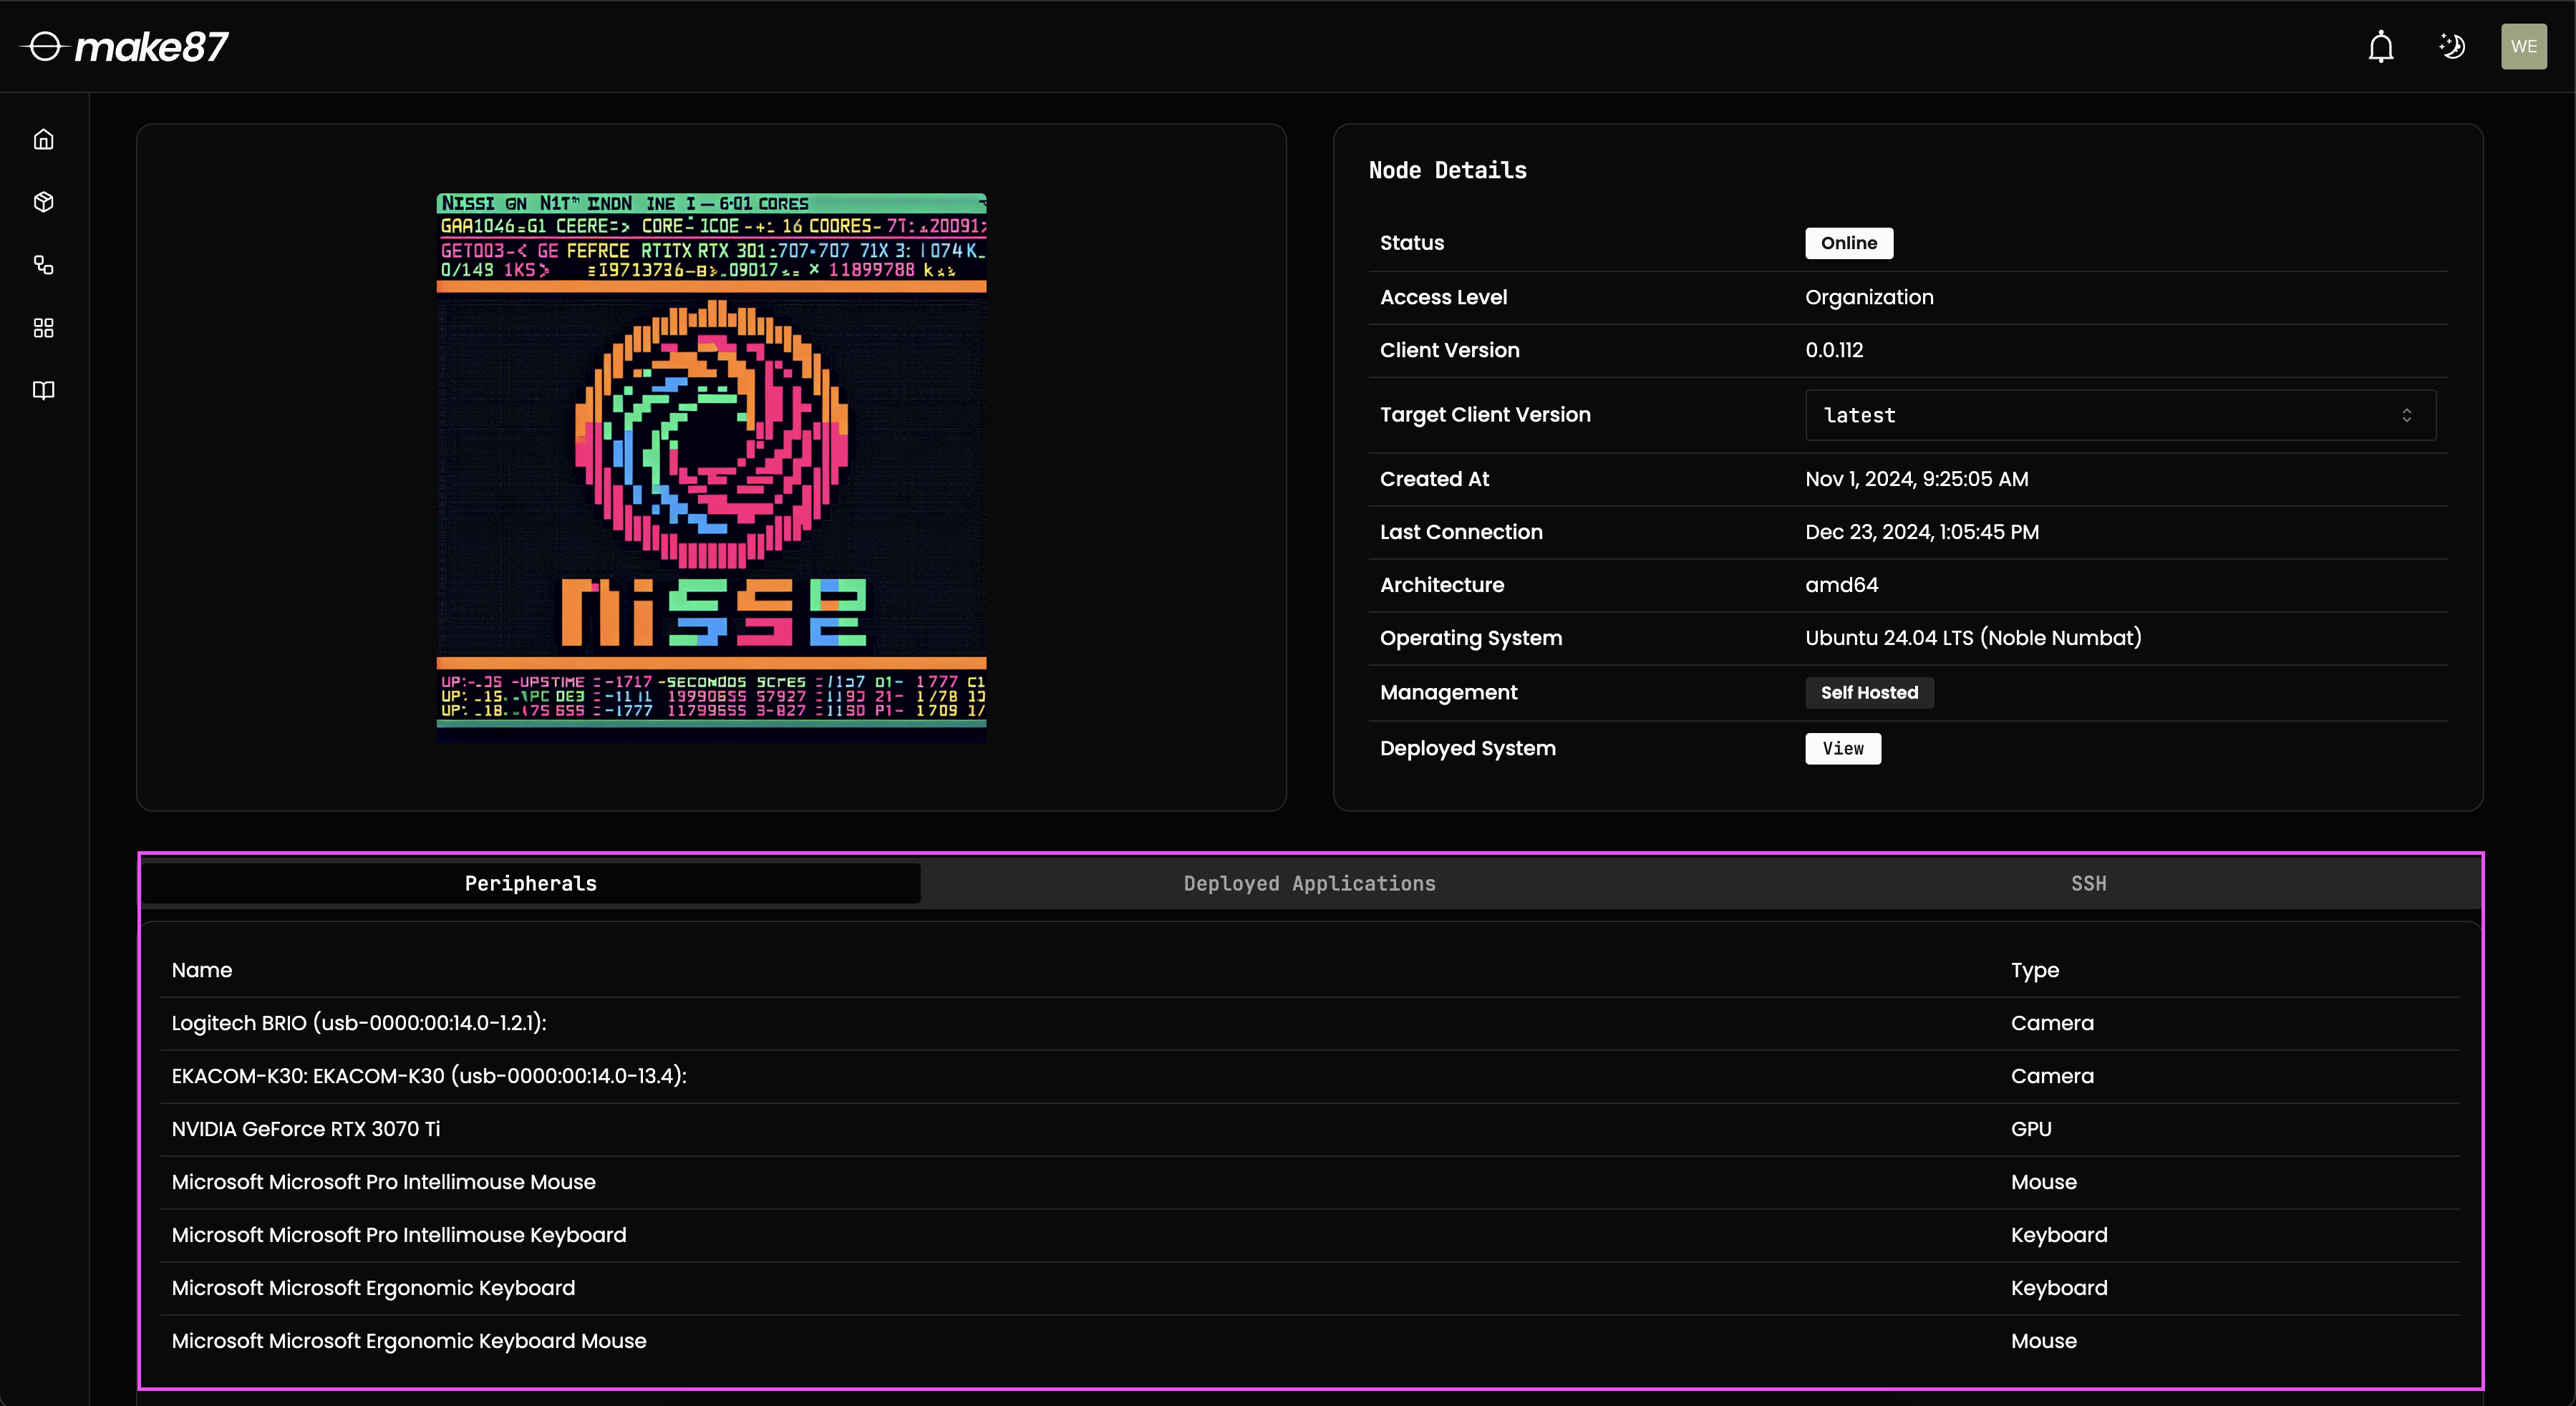
A Node is a physical or virtual machine running the node client, responsible for executing applications and managing available computing resources. Nodes can also interface with peripherals such as cameras, microphones, or other input/output devices required by applications.
While a Node can run multiple applications, it is always part of a single system at any given time.
Info
Each Node has a unique AI-generated icon for easy identification.
Node Types
Nodes are categorized into two types based on their ownership and management:
Self-Hosted Nodes
Self-Hosted Nodes are user-managed machines, either physical or virtual, that meet the requirements of the node client. These nodes provide flexibility in deployment and can access local peripherals.
Requirements
- Internet connection (for setup, updates, and optional remote access features)
sudopermissions (for installation and management)- Supported architectures:
amd64,arm641 - Supported operating systems: Any 64-bit Linux system
One-Command Installation (Recommended)
For the easiest setup experience, make87 provides one-command installation scripts for these distributions:
- Ubuntu:
20.04 (focal),22.04 (jammy),24.04 (noble) - Debian:
10 (buster),11 (bullseye),12 (bookworm) - Raspberry Pi OS (64-bit):
10 (buster),11 (bullseye),12 (bookworm)
Info
Other Linux distributions that use apt and systemd may work with the one-command installer but are not officially tested.
To register a Self-Hosted Node with make87, install the node client, which runs a lightweight management daemon to facilitate remote control and application deployment.
Manual Installation (Any Linux Distribution)
For distributions not covered by the one-command installer, you can manually install the required dependencies and the make87 node client. This works on any 64-bit Linux system.
Tip
For the most up-to-date installation procedures, you can always reference the official installation scripts, which this manual process is based on.
Required Dependencies:
- Docker with Docker Compose v2 support
- SSH server (openssh-server or equivalent)
- uidmap package for user namespace support
- System tools (recommended for peripheral auto-discovery):
v4l2-ctl(v4l-utils package)lsusb(usbutils package)gpioinfo/gpiodetect(gpiod package)nvidia-smi(for NVIDIA GPU nodes)
For NVIDIA GPU nodes, additionally install:
1. Install Core Dependencies
For APT-based distributions (Ubuntu, Debian variants):
# Install Docker
sudo apt-get update
sudo apt-get install -y ca-certificates curl gnupg lsb-release
sudo mkdir -p /etc/apt/keyrings
curl -fsSL https://download.docker.com/linux/ubuntu/gpg | sudo gpg --dearmor -o /etc/apt/keyrings/docker.gpg
echo "deb [arch=$(dpkg --print-architecture) signed-by=/etc/apt/keyrings/docker.gpg] https://download.docker.com/linux/ubuntu $(lsb_release -cs) stable" | sudo tee /etc/apt/sources.list.d/docker.list > /dev/null
sudo apt-get update
sudo apt-get install -y docker-ce docker-ce-cli containerd.io docker-buildx-plugin docker-compose-plugin

# Install other dependencies
sudo apt-get install -y openssh-server uidmap v4l-utils usbutils gpiod

# Enable services
sudo systemctl enable --now docker
sudo systemctl enable --now ssh
For RPM-based distributions (Fedora, CentOS, RHEL):
# Install Docker
sudo dnf install -y dnf-plugins-core
sudo dnf config-manager --add-repo https://download.docker.com/linux/fedora/docker-ce.repo
sudo dnf install -y docker-ce docker-ce-cli containerd.io docker-buildx-plugin docker-compose-plugin

# Install other dependencies
sudo dnf install -y openssh-server shadow-utils v4l-utils usbutils libgpiod-utils

# Enable services
sudo systemctl enable --now docker
sudo systemctl enable --now sshd
For other distributions: Use your package manager to install equivalent packages. The exact package names may vary.
2. Create and Configure make87 User
# Create make87 user
sudo useradd --create-home --shell /bin/bash make87
sudo usermod -aG sudo make87
sudo usermod -aG docker make87

# Create make87 directories
sudo mkdir -p /home/make87/.make87/bin
sudo mkdir -p /home/make87/.ssh
sudo chown -R make87:make87 /home/make87/.make87
sudo chmod 700 /home/make87/.ssh
3. Configure SSH Access
# Configure SSH for make87 user
sudo tee -a /etc/ssh/sshd_config > /dev/null <<EOF
Match User make87
    AuthorizedKeysFile /home/make87/.make87/authorized_keys
    PubkeyAuthentication yes
EOF

# Create authorized_keys file
sudo touch /home/make87/.make87/authorized_keys
sudo chmod 600 /home/make87/.make87/authorized_keys
sudo chown make87:make87 /home/make87/.make87/authorized_keys

# Restart SSH service
sudo systemctl restart sshd  # or 'ssh' on Ubuntu/Debian
4. Configure Device Access Permissions
# Create udev rules for make87 user
sudo tee /etc/udev/rules.d/make87.rules > /dev/null <<'EOF'
# Udev rules for make87 devices
KERNEL=="vchiq", SUBSYSTEM=="misc", GROUP="make87", MODE="0660"
KERNEL=="video*", SUBSYSTEM=="video4linux", GROUP="make87", MODE="0660"
KERNEL=="dma_heap*", SUBSYSTEM=="dma_heap", GROUP="make87", MODE="0660"
SUBSYSTEM=="media", GROUP="make87", MODE="0660"
SUBSYSTEM=="audio", GROUP="make87", MODE="0660"
SUBSYSTEM=="video4linux", GROUP="make87", MODE="0660"
SUBSYSTEM=="usb", GROUP="make87", MODE="0660"
KERNEL=="i2c-[0-9]*", GROUP="make87", MODE="0660"
KERNEL=="ttyAMA[0-9]*", GROUP="make87", MODE="0660"
KERNEL=="ttyUSB[0-9]*", GROUP="make87", MODE="0660"
EOF

# Set permissions and reload udev rules
sudo chown root:root /etc/udev/rules.d/make87.rules
sudo chmod 440 /etc/udev/rules.d/make87.rules
sudo udevadm control --reload-rules
sudo udevadm trigger

# Add current user to make87 group
sudo usermod -aG make87 $(whoami)
5. Install Nebula VPN
# Detect architecture
ARCH=$(uname -m)
case $ARCH in
    x86_64) NEBULA_ARCH="amd64" ;;
    aarch64) NEBULA_ARCH="arm64" ;;
    *) echo "Unsupported architecture: $ARCH"; exit 1 ;;
esac

# Download and install Nebula
NEBULA_VERSION="v1.9.3"
NEBULA_URL="https://make87-files.nyc3.digitaloceanspaces.com/dependencies/nebula/$NEBULA_VERSION/nebula-linux-${NEBULA_ARCH}.tar.gz"

sudo -u make87 curl -L "$NEBULA_URL" | sudo -u make87 tar --extract --gzip --directory="/home/make87/.make87/bin" nebula
sudo chown make87:make87 /home/make87/.make87/bin/nebula
sudo setcap cap_net_admin+ep /home/make87/.make87/bin/nebula
6. Install make87 Node Client
# Detect architecture and download appropriate binary
case $ARCH in
    x86_64) NODE_CLIENT_FILENAME="node_client-x86_64-unknown-linux-gnu" ;;
    aarch64) NODE_CLIENT_FILENAME="node_client-aarch64-unknown-linux-gnu" ;;
    *) echo "Unsupported architecture: $ARCH"; exit 1 ;;
esac

NODE_CLIENT_URL="https://make87-files.nyc3.digitaloceanspaces.com/releases/latest/$NODE_CLIENT_FILENAME"
sudo -u make87 curl -L -o /home/make87/.make87/bin/node_client "$NODE_CLIENT_URL"
sudo chmod +x /home/make87/.make87/bin/node_client
7. Create Systemd Service
# Create service file
sudo tee /etc/systemd/system/make87-node-client.service > /dev/null <<EOF
[Unit]
Description=make87 node client
After=network.target

[Service]
ExecStartPre=/bin/bash -c 'if [ -f "/home/make87/.make87/bin/node_client.tmp" ]; then mv "/home/make87/.make87/bin/node_client.tmp" "/home/make87/.make87/bin/node_client"; fi'
ExecStart=/home/make87/.make87/bin/node_client
Restart=always
User=make87
Environment="PATH=/home/make87/.make87/bin:/usr/local/sbin:/usr/local/bin:/usr/sbin:/usr/bin:/sbin:/bin"

[Install]
WantedBy=multi-user.target
EOF

# Enable but don't start the service yet (it needs registration tokens)
sudo systemctl daemon-reload
sudo systemctl enable make87-node-client
8. NVIDIA GPU Support (Optional)
If you want to enable NVIDIA GPU acceleration in containers:
# Install NVIDIA Container Toolkit
# Follow Installation Steps:
# https://docs.nvidia.com/datacenter/cloud-native/container-toolkit/latest/install-guide.html#installation

# Generate CDI specifications
sudo nvidia-ctk cdi generate --output=/etc/cdi/nvidia.yaml
sudo mkdir -p /home/make87/.config/cdi
sudo cp /etc/cdi/nvidia.yaml /home/make87/.config/cdi/
sudo chown -R make87:make87 /home/make87/.config

# Update service file to include CDI environment
sudo sed -i '/Environment=/s/"$/ "CDI_SPEC_DIR=\/home\/make87\/.config\/cdi"/' /etc/systemd/system/make87-node-client.service
sudo systemctl daemon-reload
9. Complete Registration
After manual installation, you'll need to register the node through the make87 web interface:
- Go to your make87 dashboard
- Click "Import Self-Hosted Node"
- Get the registration token from the web interface in form
AUTH_REQUEST_ID=<your-auth-request-id> - Configure the node client with the registration credentials
- Start the service:
Peripheral Discovery Tools
The system tools listed above (v4l2-ctl, lsusb, gpioinfo, etc.) are recommended but not required. Without them, peripherals can still be mounted manually as GenericDevice types. See the Peripheral Discovery page for more details.
Managed Nodes
Managed Nodes are provisioned on-demand and fully managed by make87. They are designed to work seamlessly with the platform from the moment they are created.
Note
Managed Nodes are billed hourly, starting when the node is created and stopping when it is deleted. They are available to Team and Enterprise tier users only. Free tier users can only use Self-Hosted Nodes.
There are two variants of Managed Nodes:
- CPU Nodes – Optimized for compute-intensive tasks that do not require GPU acceleration.
- NVIDIA GPU Nodes – Optimized for AI/ML applications requiring NVIDIA GPU acceleration with NVIDIA Container Toolkit pre-installed.
Since Managed Nodes are cloud-hosted, they do not provide access to local peripherals such as cameras or other I/O devices.
Node Configuration and Management
Nodes in make87 can be configured and managed via the platform interface:
- Adding a Node – Register a new node to an existing system.
- Monitoring Node Status – View resource usage, logs, and running applications.
- Updating and Removing Nodes – Apply updates or remove nodes as needed.
Peripherals
Peripherals describe any hardware that is connected or part of a node. This includes, but is not limited to, cameras, microphones, speakers, and other sensors. It also includes compute accelerators or devices that are discoverable via the local network like IP cameras.
It's easiest to think about peripherals as everything in /dev and devices advertising themselves via the network
through a supported protocol.
Once a user mounts peripherals into an application, they are available inside that application's container. By requiring and mounting peripherals explicitly, we ensure that applications only have access to the peripherals they need. This is a key security feature of make87.
Supported Peripherals
make87 supports a wide range of peripherals. We differentiate between peripherals that our platform automatically discovers and helps to mount into applications, and those that are completely manually configured by the application developer.
Read more about Peripheral Requirements and how to configure them for your application. For detailed information about peripheral discovery, see the Peripheral Discovery page.
Example: Discovered Peripherals
Adding Nodes
Managed Nodes
- Click on
Nodesin the sidebar. -
Select your private or another org.
- Make sure you select a region that is close to you or the other system's nodes to minimize latency.
- Click on
Add A Managed Node. - Select the desired specs for the node.
Team and Enterprise users can add managed nodes to their orgs
Everything will be automatically set up for you and ready to be used without further configuration. You will receive a notification once the node is ready to use (this should only take a minute or two).
Self-hosted Nodes
- Click on
Nodesin the sidebar. - Select your private or another org.
- Click on
Import Self-Hosted Node. - Request either
CPUorNVIDIA GPUinstall commandCPUis the default. Only selectNVIDIA GPUif you have an NVIDIA GPU installed and would like to use GPU acceleration in containers.
- Copy the installation command.
- The installation command includes a unique token that is used to identify your node. Do not share with anyone else.
- Open a terminal on your node, or SSH connection to it. Then paste and run the installation command.
- The installation process will ask you for your password to establish
sudopermissions during installation.
- The installation process will ask you for your password to establish
- After installation, you will receive a node authentication request notification in the platform. Follow the steps to approve the request.
Adding a self-hosted CPU node to your personal org
Paste the command into a terminal on your node, e.g., via an SSH connection
Click on the notification and follow the authentication flow
Removing Nodes
The following steps will guide you through removing a node from the platform. It works for both Managed and Self-hosted Nodes with the difference that Managed Nodes are billed by the hour and the billing stops when the node is removed.
- Click on
Nodesin the sidebar. - Select the three dots
...next to the node you want to remove. - Click on
Delete.
Purging make87 from self-hosted Nodes
While Managed Nodes are automatically deleted after being removed, self-hosted Nodes are only disassociated with the user's organization. This means that the node is still running and under regular ownership by the user who added it. Also, the node client is still installed on the node but its unique keys are revoked.
To fully clean a Self-hosted Node, follow these steps:
- Open terminal on the node or SSH connection to it.
- Disable the node client:
- Remove the node client:
- Remove the make87 user:
- Reboot your system:
-
also known as
x86_64andaarch64↩